 |
|||||||||
| |
|
|
|
|
|
|
|
|
|
Curvemeister 101: Week 5
The Wonderfulness of Mask
Selecting a Mask Channel and Inverting the Mask
Darkening a Sky and Making it More Blue
Adding Color Without Creating "Demon Eyes"
Masking by LightnessExample 1: Black Tassels
Example 2 : Sun Moon Lake Harbor
Example 3: Sun Moon Lake: View from the Temple
Example 4: Masked Lemurs
Example 5: Taipei Graffiti: Using Lightness as a Saturation Mask
Example 6: Flower vendor
The Wonderfulness of Mask
If you took the earlier Curvemeister class, this is probably the section you've been waiting for, because masks are the knock down, drag-out cool new feature of Curvemeister 3. With masks, certain operations that used to require a separate pass in Photoshop or Elements can now be done in one fell swoop, saving time, and making it easier for you make your images look fantastic.
Caution: Masks are a potent new force. After you learn about masks, you will start to use masks on just about every image you work on. This is normal, but it should only be a passing phase. After a month or two, you will realize that 90 percent of your images do not need a mask at all.
Rubylith - the analog way to mask a pattern.In the old days of airbrushing, an artist used a mask to protect one part of an image while painting on another part. The mask could be a piece of paper or cardboard, with holes or an outline cut into it, or a commercial product called rubylith, a red colored transparent plastic that could be carved with a knife, removed from its backing, and stuck to the image. This is why Photoshop and Curvemeister use a default mask color of transparent red.
In Curvemeister, Photoshop, and other programs, a mask is an additional black and white image whose job is to determine how much effect your adjustments will have on your image. Where the mask is white, your adjustment will have its full effect. Black means your adjustment will have no effect. You'll save yourself time and effort by finding a way to memorize this fact. Think of the original Rubylith, with the clear areas as white mask, and the ruby areas as black. Or "minimum light for minimum effect, maximum light for maximum effect. If you are inclined, remember that black has a color value of zero, so the effect is zero.
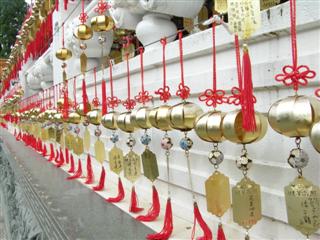
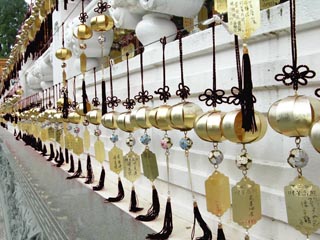
Example 1: Black Tassels
this example has an accompanying video
In the following example, I'm going to show you how to set up a mask for the red tassels in the image below, and use the Lightness curve to make the tassels black. We saw how to selectively change the color of objects in certain situations, using curves, in the previous session. Changing lightness based on color is an operation that is probably impossible without a mask of some sort.
We're going to use a mask to make the tassels black.
[right click here and use your browser to save the original image]Please watch the video
to see this procedure in detail, then see if you can do it yourself. When curving your mask, make sure that the edges of the threads are as close to pixel perfect as possible. No jaggies. If you're not nuts about black tassels, please feel free to add your own variation to the final image, the idea is to get comfortable with using masks.
A final word of caution: For this exercize you will need to soften the mask a bit to capture the redish reflection or shadows of the tassels as well as the main part of the tassels.
Darkening a Sky and Making it More BlueAlmost every image taken outdoors can be improved by darkening the sky. The Ansel Adams site is well worth a look, and is of specific interest now because we're going to be darkening skies, and the majority of Adams's landscape images have dark skies Adams accomplished his dark skies by using a red filter on the lens, which blocked most of the blue light, darkening the skies We can do the same thing digitally by using the red channel, and the result is a black and white image.
.
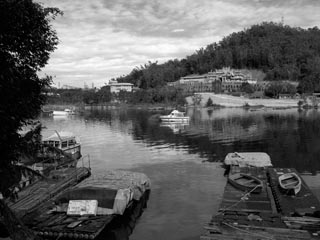
This landscape, like most landscapes,
could use a darker sky
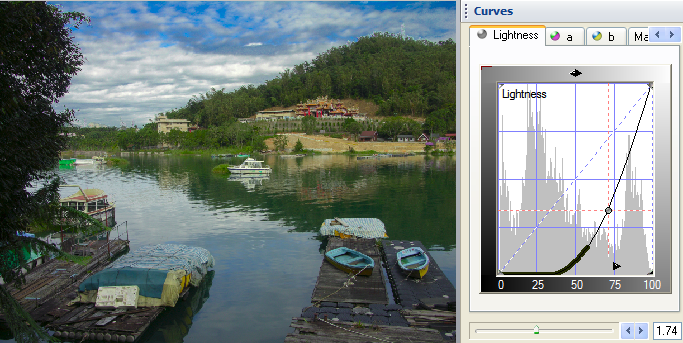
Click on the red channel tab in Curvemeister, and voila, instant red filter. This is the kind of effect we are after.Adams also used a darkroom technique called burning in, which used a moving shape or mask to darken the sky even further. We'll use a mask based on the brightness of the image, and will be dealing with a full color image, but otherwise our goals are the same - making the sky darker. Let's look at the Mask Carte for this image.
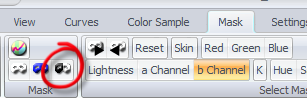
Click on the circled icon to see the Mask Carte.
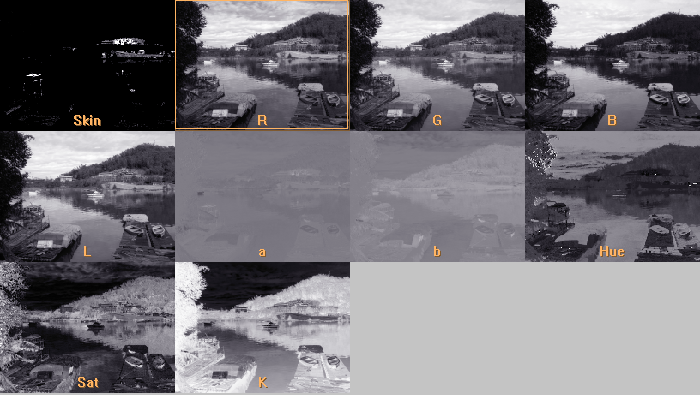
The mask Carte shows at least three contenders for separating out the sky, B, L, and K.The K mask depends on the GCR setting in wgCMYK, so if you are considering using K as a mask, click on the wgCMYK radio button, and try the various settings for GCR. Use the slider to adjust the amount of black in the layer when you start.
The B and b channels are usually an excellent masks for the sky. In this case, though, there are other blue objects in the image, including the boats in the lower right foreground. Since we don't want to darken those, I'll be using the K channel to select for the sky. This is done, as you might guess, by clicking on K in the Mask tab of the ribbon. See video
When choosing a mask, look for contrast, and remember the mask needs to be white in the areas we are changing. Since the K channel is black in the sky, and we want to change the sky. As chance would have it, the invert icon
in the ribbon's mask tab does exactly what we want. It inverts the mask so that white areas are black, and vice-versa..
The mask invert button is in the ribbon's mask tab. You can also invert the mask by moving the end points of the curve until the curve line is running from Upper left to lower right in the curve window.The next step, after selecting a mask, is usually to crank up the contrast. Here's an example of a mask curve, and the resulting mask. Remember you can also adjust the mask after the fact, while viewing the full color image..
Keep your mask curve simple: a straight, steep line to bump the contrast.
Our curve will darken things that are white. Can you think of a way from
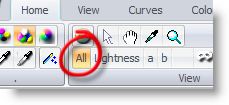
the last session to clean up this mask, and avoid changing the boat?Now it's time for the rubber to meet the road. First click on the All icon to see the entire image. I'll be working in Lab for this example. You may want to explore the other color spaces to see if you like them better.
Click the All icon to see the full color image instead of the mask.
After preparing the mask, darkening the sky is a matter of one point on the Lightness curve, and moving the saturation slider.
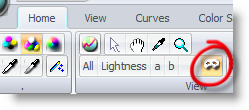
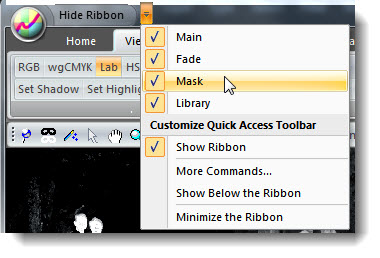
Blurring the mask: As of Curvemeister 3.8.1 you can use the Blur Slider to blur the mask and feather the edges of your adjustments. If you do not see the blur slider displayed in the interface you can add the menu buttons by using the Customize controls button in the upper left of the interface as shown below; Click on the mask check box to make the mask blur and GCR sliders visible in the interface.
Why Blur the mask? Masks can create artifacts in the image that make your changes look cut out. This is especially true if your change is dramatic along an edge. The tree line in this image is a good example of an area where blurring the mask helps soften the transition and reduce the artifact.
Example 2 : Sun Moon Lake Harbor
Recreate the mask and correction described above. See if you want to use the R or Lightness curve as your mask. Add some touches of your own if you would like.
Curvemeister v 3.0.1 has a bug that affects the K channel.
You must un-invert the mask before clicking the Apply button. You may want to install beta 3.0.5 or later to fix this problem.
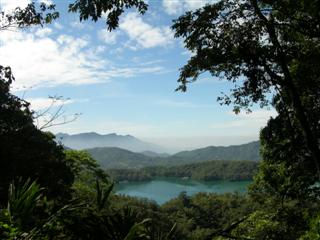
Example 3: Sun Moon Lake, View from the Temple
Use the K channel to darken the sky in this image, and make it more blue. If you can, isolate the sky so that you maintain the contrast between the lake and surrounding land.
Curvemeister Feature:
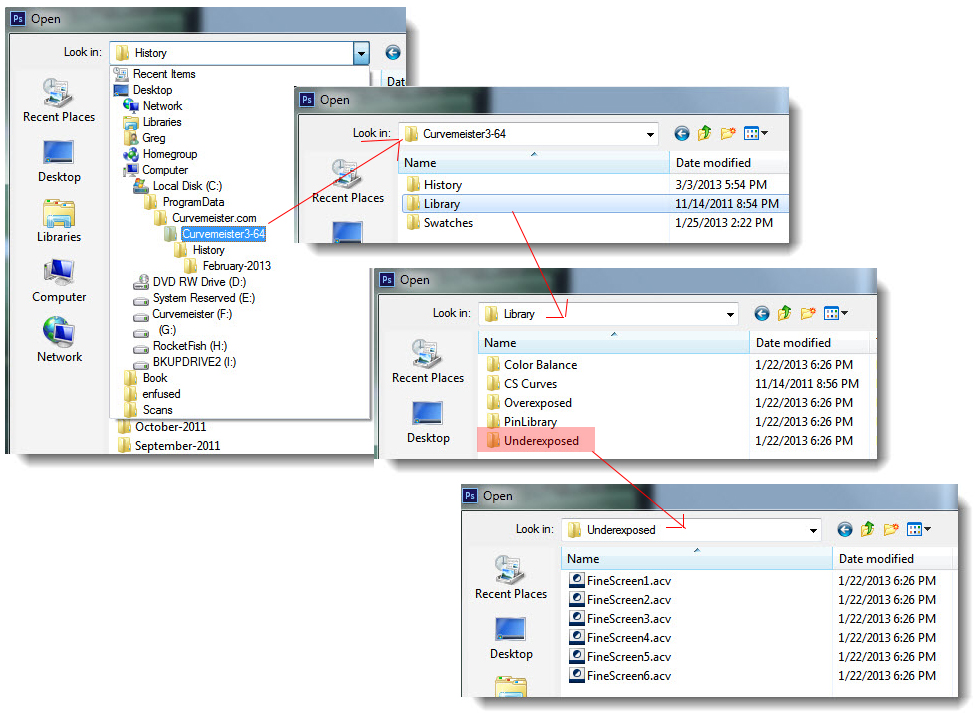
Curvemeister allows you to use saved curves from other images. All curves that you "apply" by clicking the apply button are stored in the history folder. The History folder is stored within in the Library folder. To quickly access the History folder click the "load" button in the interface above the "save" button. This will open the current months history folder and any curves you have applied are stored there.
Additional Features:
Curvemeister provides you with some pre-calculated curves. These special curves recreate the Multiply and Screen modes for the layer. This allows you to use a screen curve combined with a mask instead of making a screen or multiply move in the Photoshop interface. This is a time saver and it also allows you to apply advanced adjustments to your image in one step. These curves are stored in the Library as well as the history curves shown above. to access these curves you can click on the file tree pull down as shown below:
Here is a video hint on how to set up your interface to allow easy access to these features:
The Saturation Trap:
Using the LAB saturation slider is a fast and convenient way to add saturation to your image. Most LAB adjustments require some adjustment to the saturation of the image because when you adjust the image contrast using the L channel you change the apparent saturation of the colors. A brighter color can look less saturated than a darker one can for the same original color value.
So what is the saturation trap?
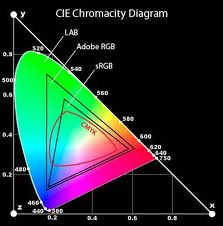
Because LAB has a larger color gamut than RGB it is possible to create colors in LAB that cannot be displayed or printed in RGB color space. In the image below you see LAB as the outside colored frame area with Adobe RGB and sRGB as well as CMYK over layered.
As you can see it is possible to create colors in LAB that are impossible in RGB. This is the trap.
A way out...
LAB is so fast, so simple, and so powerful we need ways to limit the effects of our adjustments so that we do not oversaturate our images in ways that cannot be printed or displayed in a real way. Since this week is all about masking we will start by limiting the saturation by using a mask.
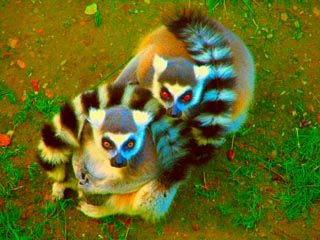
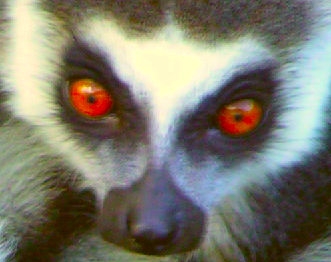
Adding Color Without Creating "Demon Eyes"
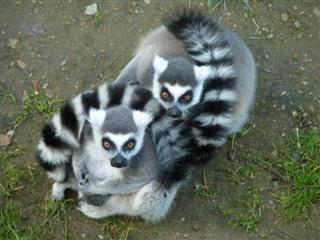
The cute lemur on the right turns into a demon
unmasked, with eyeballs like little red LED's, after you crank up the saturation,
[right click here and use your browser to save this image]The above image takes on demonic proportions if you use Curvemeister's Lab slider to bump the saturation. The animals' eyes have a higher saturation than the other items in the image, so they go off the deep end sooner as you increase the slope of the a and b curves. Let's use masks to tone them down.
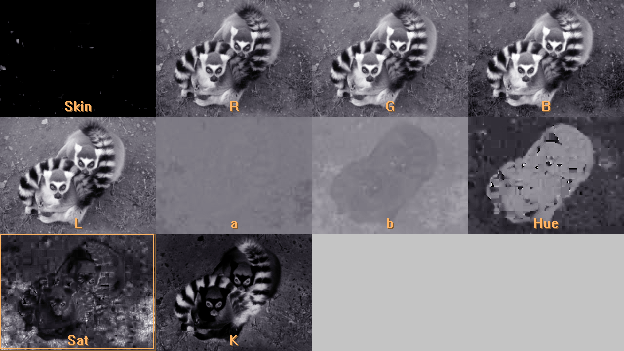
Curvemeister's Mask Carte. This is shown when you have not yet selected a mask,
When picking a mask, look for contrast between areas you do and do not want to
change with curves. In this case, the b channel is a good bet, because the eyes
are lighter than the bodies of the lemurs.In Curvemeister, masks are created by selecting them from a menu of images called the Mask Carte. In general, you can look at the Carte on your screen, and choose the mask that you think will do the best job of separating the areas that you want to "protect" or mask from being modified by the curves. This means the areas you want to mask should be either darker or lighter than the other parts of the image.
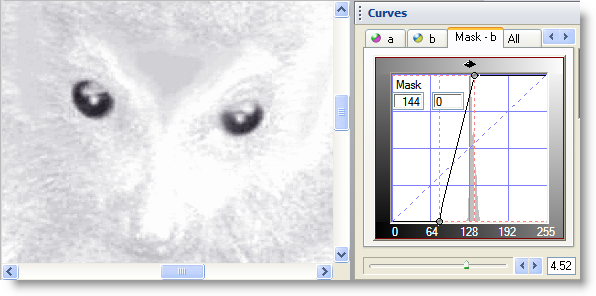
We want to mask for the eyes, and it's OK if we also knock out some of the color of the the orange leaves on the ground. All of the masks, with the exception of the b and perhaps the a channel, have both light and dark areas that have nothing to do with the eyes. So let's see what happens when we click on the b channel in the Mask Carte.
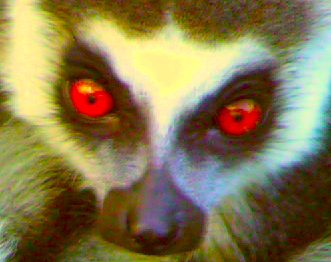
This is an enlarged section of the lemur image, with the saturation greatly increased. Most of the fur is normal looking, however the eyes are too red to believe. Our goal is to have our cake and eat it too: knock the color in the eyes back a bit, and keep the richer colors in the remainder of the image.
Here is the lemur image after selecting the b channel as the mask. A little better, but the eyes could do with a less color, and the fur is losing the good color we just added.
As often happens, the mask channel needs to be juiced up a bit - made more contrasty.
To look at the mask channel, click on the button in the ribbon bar to show just the mask. You'll see something like the image on the right.
All dull and dingy, right? Well, by now we know exactly how to fix up an image like this - get hold of a curve and move the end points.
Now the mask curve is substantially steeper, and the mask itself shows much more contrast. Now we're cooking!
Click on the All button in the ribbon, and here's the full color image on the right. The color we added to the fur is still there, but the demon eyes are cured!
Are we happy now? Normally, you would do some further adjustments to the mask curve, and perhaps to your actual curves at this point. I actually cheated, and showed you my final, adjusted curve in the previous step. That's the sort of thing people like me do when writing up examples like this.
Here's the result, with the original demon-eyed version of the image on the left. Notice that some of the distracting orange clutter on the ground is less noticeable too. Did we overdo it, and take out too much of the orange, or give up to much of the fur color that we added? All of this is controlled by the mask you choose, and the curve that you apply to the mask.
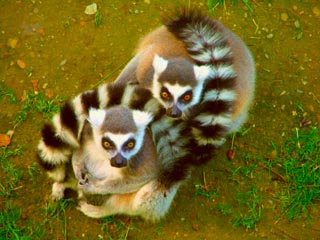
Example 4: Masked Lemurs
Repeat the exercise above, using masks. Can get a similar result, using curves only, instead of a mask, for this particular image? (Hint: put a downward bump in the a curve).
Download the [original lemur image], and try this out yourself.
This time, make the eyes a little brighter red.
Masking by Lightness
Many images are helped by making brighter colors more saturated. This can be done quickly in Curvemeister by selecting Lightness as the mask, and bumping the saturation, either with the saturation slider in Lab, or using the S curve in HSB mode.
The original imageThe right half of the image is in shadow, and intense colors (bottom image on right) don't sit very well. The upper image on the right uses a mask to reduce the increase in saturation in the darker parts of the image.
An Lab saturation bump, with mask.
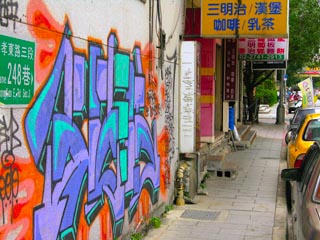
The same saturation increase, without the mask.Example 5: Taipei Graffiti - Using Lightness as a Saturation Mask
Use Lightness, or any other mask of your choice, to concentrate your color changes on the letters on the left half of the image. Can you get a similar effect, without resorting to using a mask? Watch out for oversaturated colors distracting from the Graffiti.
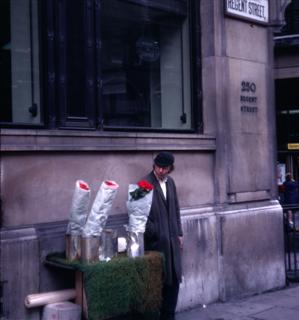
Example 6: Flower vendor
Hint: this image has a shadow, highlight, and neutral. It's your decision whether to use a mask or not.
I'm going to ask you to jump into the deep end of the pool with a medium difficult image. I hope that you are reasonably confident that you can improve this image using the techniques you have learned so far.
This image has a number of problems, the biggest one being the blue cast. Keeping in mind that sidewalks make good neutrals, as well as your knowledge of skin tones, see what you can do to make this image look as good as possible. You are free to use any and all techniques covered so far in the class.
London flower vendor. This image was provided by Tony Cooper for class use.
[original image]This has been a crash course on masks. I eagerly await your feedback. I hope that these examples will keep you busy enough!
Happy curving from Greg and Mike!


![[right click here and use your browser to save the original image]](images/2007-11-20_223507.jpg)
![[original image]](images/2007-11-20_181115.jpg)
![[original]](images/2007-11-20_200751.jpg)
![[right click here and use your browser to save this image]](images/2008-01-30_152316.jpg)
![[Original Image]](images/2007-11-19_175158.JPG)
![[original image]](images/londonflower.jpg)
|
 Site designed by Paradox Media |