 |
|||||||||
| |
|
|
|
|
|
|
|
|
|
Curvemeister
![]() There is a video version of this example.
There is a video version of this example.
The hint for this exercise looked like this.
|
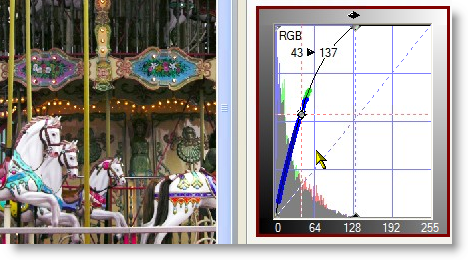
If your curve and image look about like the image above, you've done well with this exercise. To get this result, you relied on the appearance of the image, making a subjective judgement about when the horses were too light, etc. Let's look at another way to accomplish a similar result, but with more accuracy because you will be using Curvemeister's shadow and highlight capability. |
|
|
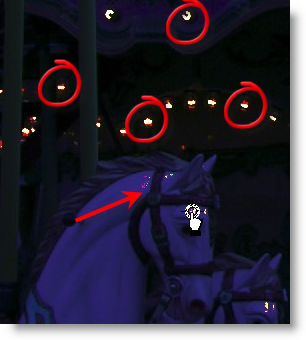
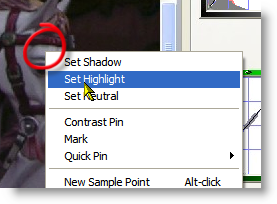
Starting from scratch, right click on the area above the leftmost horse's eye, and select Set Highlight, creating a highlight point.
Drag the highlight point around, fine tuning the location so that you minimize any blocks of white or brightly colored pixels - such as the ones in horse's mane above. Keep in mind that you are making a judgement about what areas of white are important
|
|
|
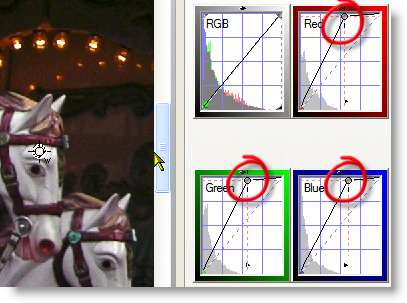
Let's take a closer look at the "fine tuning" process. What you are doing here is making a judgement about which highlight detail is important, and which is not. The light bulbs in the background do not contain any important detail, so it's OK to represent them as solid blocks of color. The carved white horse, on the other hand, is an important object in the image. Every bit of shading is critical, and fine tuning the location of the highlight to avoid "blown out" areas of solid white will preserve this detail. In RGB, you will also see solid colored areas, indicating one or more channel is blown out. |
 |
|
Once the highlight location is established, notice that the curve is completely different than what you saw in the first image on this page. Instead of setting the end point of the RGB curve, the individual red, green, and blue curves were modified. This is really the correct way to set a highlight, rather than moving the RGB endpoint. Also, when you fine tuned the location of the highlight point, you made a judgement about which highlight detail was important. Curvemeister did the rest automatically, creating three different RGB curves. By using a highlight point, you have turned a subjective operation into a "by the numbers" operation. |
 |
|
Now we'll finish up using the RGB curve just as we did in the hints, adding one point to open up the shadows, and another to restore the shape to the brighter parts (quarter-tone) of the image.  |
|
|
You may be picking up on the fact that the RGB curve should really be avoided when possible. A logical question, then, might be whether there is a better way to add brightness than moving the RGB curve. The answer is yes. First, you can correct in Lab mode, where there is no conflict between brightness and color. In RGB mode, we will use floating neutrals, later in the class, to change brightness. |
|
Thanks for looking, and happy curving!
|
 Site designed by Paradox Media |